Uploading Images to Supabase with Express JS, Multer and Vue

I am going to keep this short because I’m guessing you’ve been scouring the net, tutorial after tutorial, blog after blog hunting for a solution (like I did 🥲). If you're struggling to send images to your server or upload them to Supabase, this blog is your saving grace. I've been through the same ordeal, so let me put an end to your suffering.
Assuming your client and server are already communicating, let's jump right in.
To access the full source code for this tutorial, visit the GitHub repository here. Feel free to clone, fork, or star the repository for future reference and experimentation. Remember to add the environment variables for the server and client.
Uploading the Image on the Client
In this tutorial, we'll be using Vue to demonstrate the upload process, but rest assured, the principles and techniques we'll cover are applicable across various frontend technologies.
Accepting User Inputs
<template>
  <form>
    <label for="upload"> Upload an image </label>
    <input type="file" id="upload" accept="image/*" @change="uploadFile" />
  </form>
</template>
Inside the template, we have a form with an input and a label.
The input has an
acceptattribute set toimage/*, which restricts file selection to only image files.There's an
@changeevent listener attached to the input, triggering theuploadFilemethod when the user selects a file.
Sending the Image to the Server
To simplify the file upload process, we'll use axios, a promise-based HTTP client, to send a POST request to our server endpoint located at http://localhost:3001/api/images. Before proceeding, ensure you've installed axios in your project by running npm install axios.
<script setup lang="ts">
import axios from "axios";

// global constant containing the API base URL -> /api
const baseURL = __API_PATH__;

// create an axios instance with the base URL
const api = axios.create({ baseURL});

// function to upload a file
async function uploadFile(event: Event) {
  const files = (event.target as HTMLInputElement)?.files;

  try {
    if (!files || files.length === 0) {
      throw new Error("You must select an image to upload.");
    }

    // get the first file from the filelist
    const file = files[0];

    const formData = new FormData();
    formData.append("file", file);

    const response = await api.post<{ image: string }>("/images", formData, {
      headers: {
        "Content-Type": "multipart/form-data",
      },
    });

    const image = response.data.image;
      console.log(image)
  } catch (error: any) {
    console.error(error.message);
  }
}
</script>
Let’s break down what this uploadFile function does.
Accepts the Event: This function grabs the event triggered by the file input element.
Gets the File: It pulls out the selected file(s) from the input element. If none are selected, it throws an error. All
<input>element nodes have afilesattribute of typeFileListon them which allows access to the items in this list. If a file is selected, we retrieve the first file from the file list usingfiles[0].Prepares the File: The
FormDatainterface provides a way to construct a set of key/value pairs representing form fields and their values.const formData = new FormData()creates a new FormData object to store the file data, making it suitable for transmission via POST request.Sends a POST Request: Using the axios instance, a POST request is sent to the server endpoint
/images, with the FormData attached to the request body. We set theContent-Typeheader tomultipart/form-datato inform the server that we're sending a file.Handles Responses and Errors: If the request is successful, we can expect a response in the
dataproperty. If anything goes wrong during the upload process, we catch the error and log it out for debugging purposes.
That's it! Our image is now ready to be sent to the server.
Configuring Express to Handle Image Uploads
Now that we’ve configured our client to accept and send images, let’s set up our Express server to handle incoming image uploads. To accomplish this, we'll make use of Multer, a node.js middleware specifically designed for handling multipart/form-data.
Installing Multer
Navigate to your server directory and install Multer.
npm install multer
If you're working with TypeScript, remember to install Multer's type declarations as well.
# install as a dev dependency with -D
npm install -D @types/multer
Setting up the Route
Here’s how we can integrate Multer into our Express server.
import cors from 'cors';
import 'dotenv/config';
import express from 'express';
import multer from 'multer';

// initialize express app
const app = express();

app.use(cors()); // enable `CORS` for all routes
app.use(express.json()); // enable parsing of json request body
app.use(express.urlencoded({ extended: true }));

// Store uploaded files in memory
const storage = multer.memoryStorage();

// Initialize multer with the storage configuration
const upload = multer({ storage: storage });

//route handler
app.post('/api/images', upload.single('file'), async (req, res) => {
  try {
    const file = req.file;

    if (!file) {
      res.status(400).json({ message: 'Please upload a file' });
      return;
    }

    console.log(file);
  } catch (error) {
    res.status(500).json({ error: error });
  }
});
Let’s understand what this snippet does.
Initializing Multer
We set up Multer to store uploaded files in memory using multer.memoryStorage(). This ensures that files are kept in memory and not written to disk.
Specifying Field Name Using upload.single("file"), Multer accepts a single file with the given fieldname ("file") and stores it in req.file.
It is important that fieldname value matches the key we added the formdata from the upload function on the client. The fieldname tells Multer which field on the request it should look for the files in. In our case our fieldname is file.
// from the uploadFile function on the client
formData.append('file', file);

// on the server
upload.single('file');
If these fields aren't the same in the HTML form and on your server, the upload will fail, producing the error MulterError: Unexpected field.
After uploading, Multer adds a file object to the request, which contains details about the uploaded file. This object can be accessed using req.file in the route handler. The log statement should produce an object of a similar shape.
{
  fieldname: 'file',
  originalname: 'image-name.jpg',
  encoding: '7bit',
  mimetype: 'image/jpeg',
  buffer: <Buffer ff d8 ff e0 001 00 00 01 00 01 0f 0f ... 4098 more bytes>,
  size: 4148
}
That's it! With Multer configured, we can now send our images to Supabase.
Uploading Images to Supabase
Now that we've tackled the client-side and server-side setup for handling image uploads, it's time to explore how we can store these images using Supabase storage.
Setting up Supabase
Before we proceed, ensure you have a Supabase project set up. If you haven't already, sign up for a Supabase account and create a new project. Once your project is created, you'll need to set up a storage bucket to store your images.
Once your project is created, navigate to the storage page.

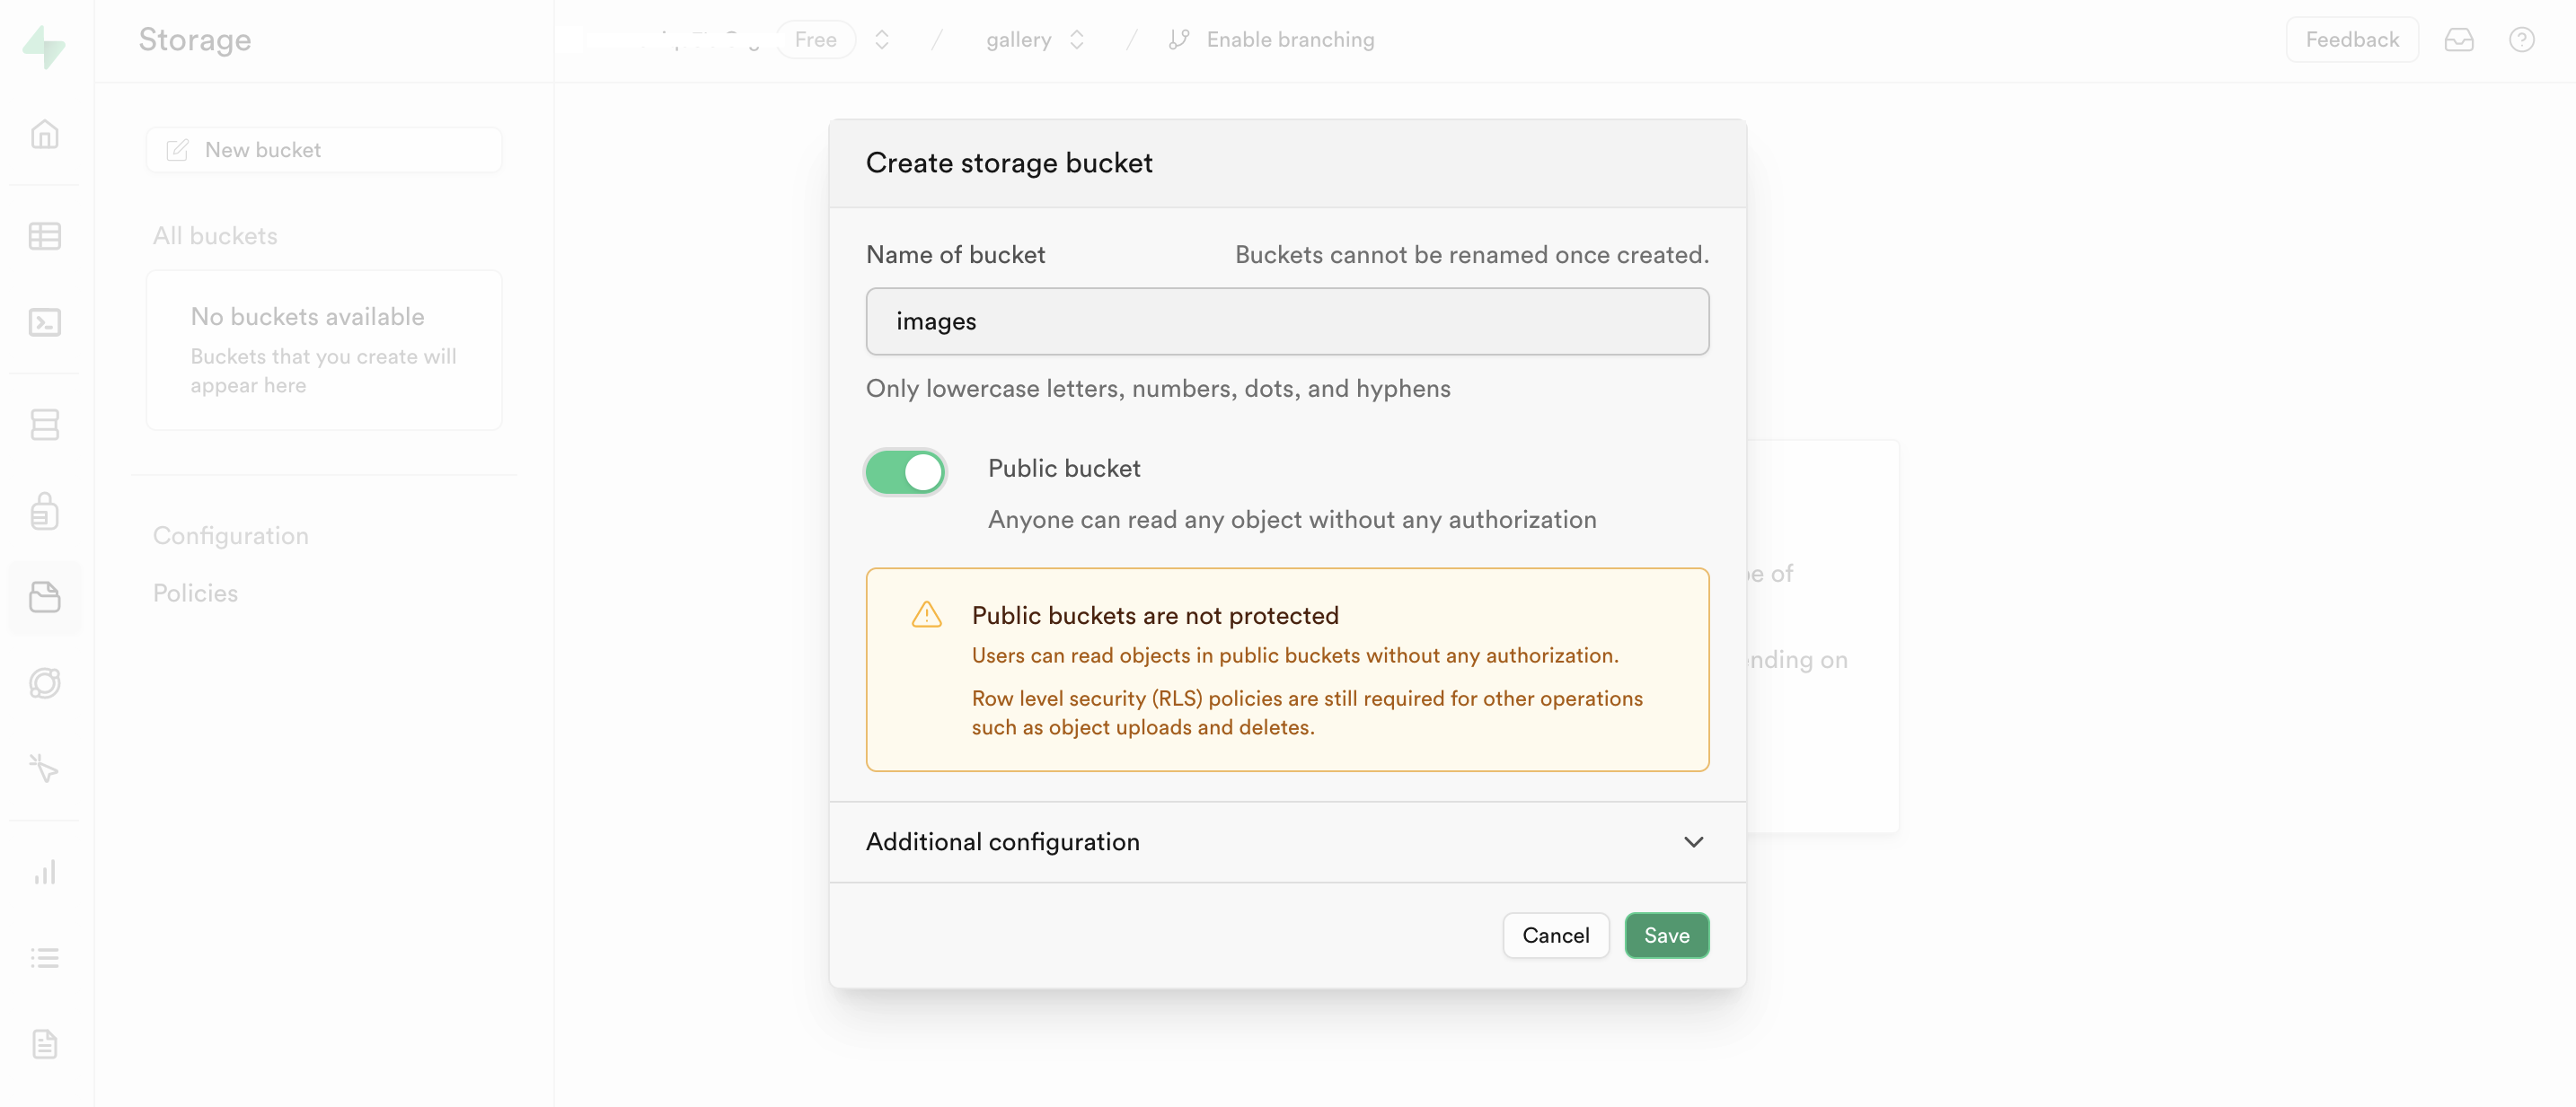
Next create a public bucket named images.
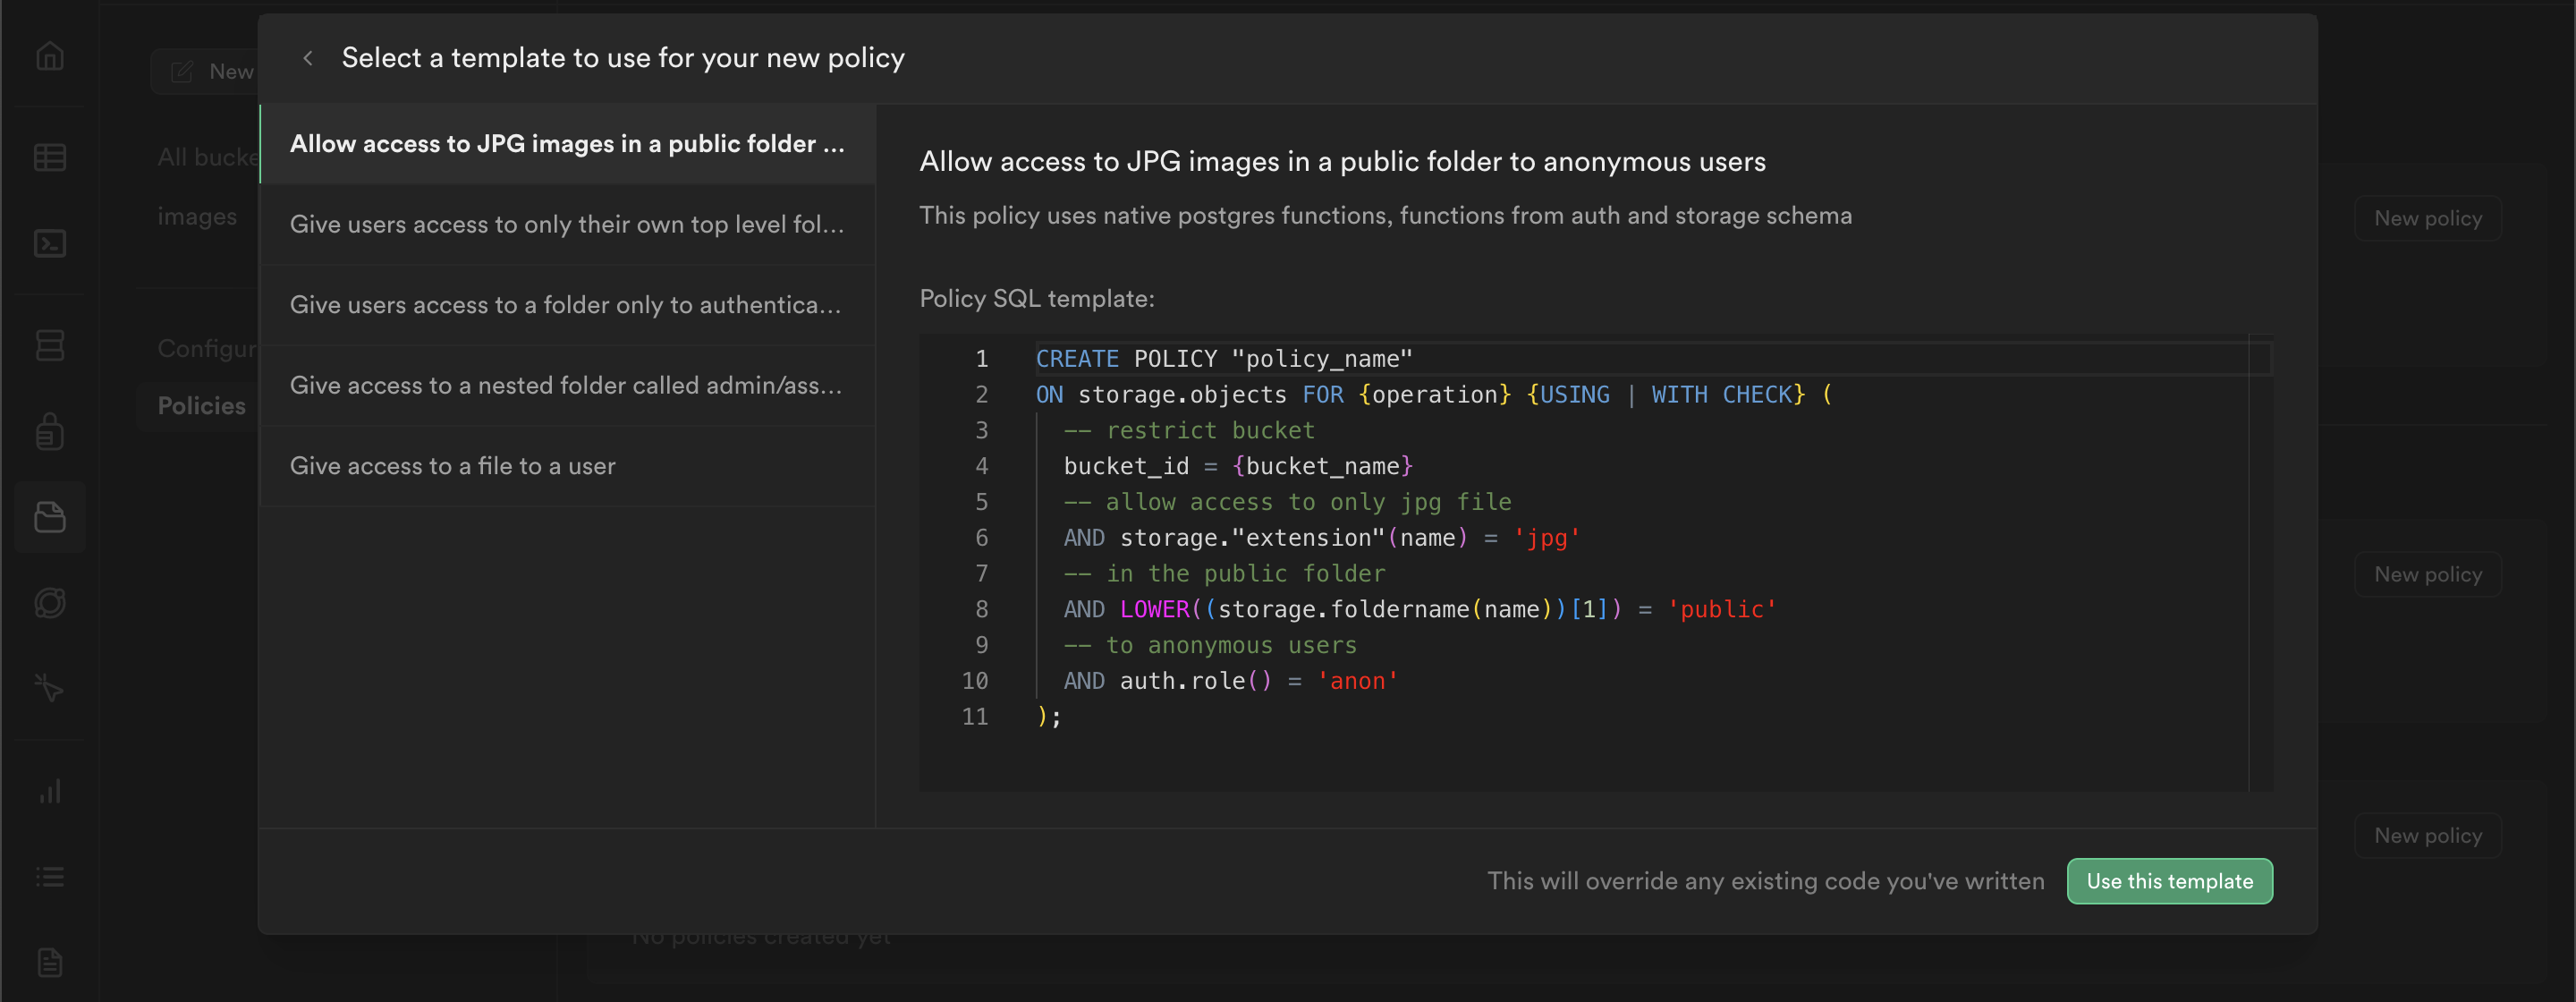
When your bucket is created add a policy to allow insertion into the bucket. Beneath the Configuration heading, select ‘Polices’ and the click the ‘New Policy’ button in the images section.

It should open up a modal. Select ‘Get started quickly’.

Select the first option, then click ‘Use this template’.
Now you can configure the policy based on your project needs. For now we will allow anyone to upload and fetch images to and from the bucket. Once this is done select ‘Review’ then ‘Save Policy’.
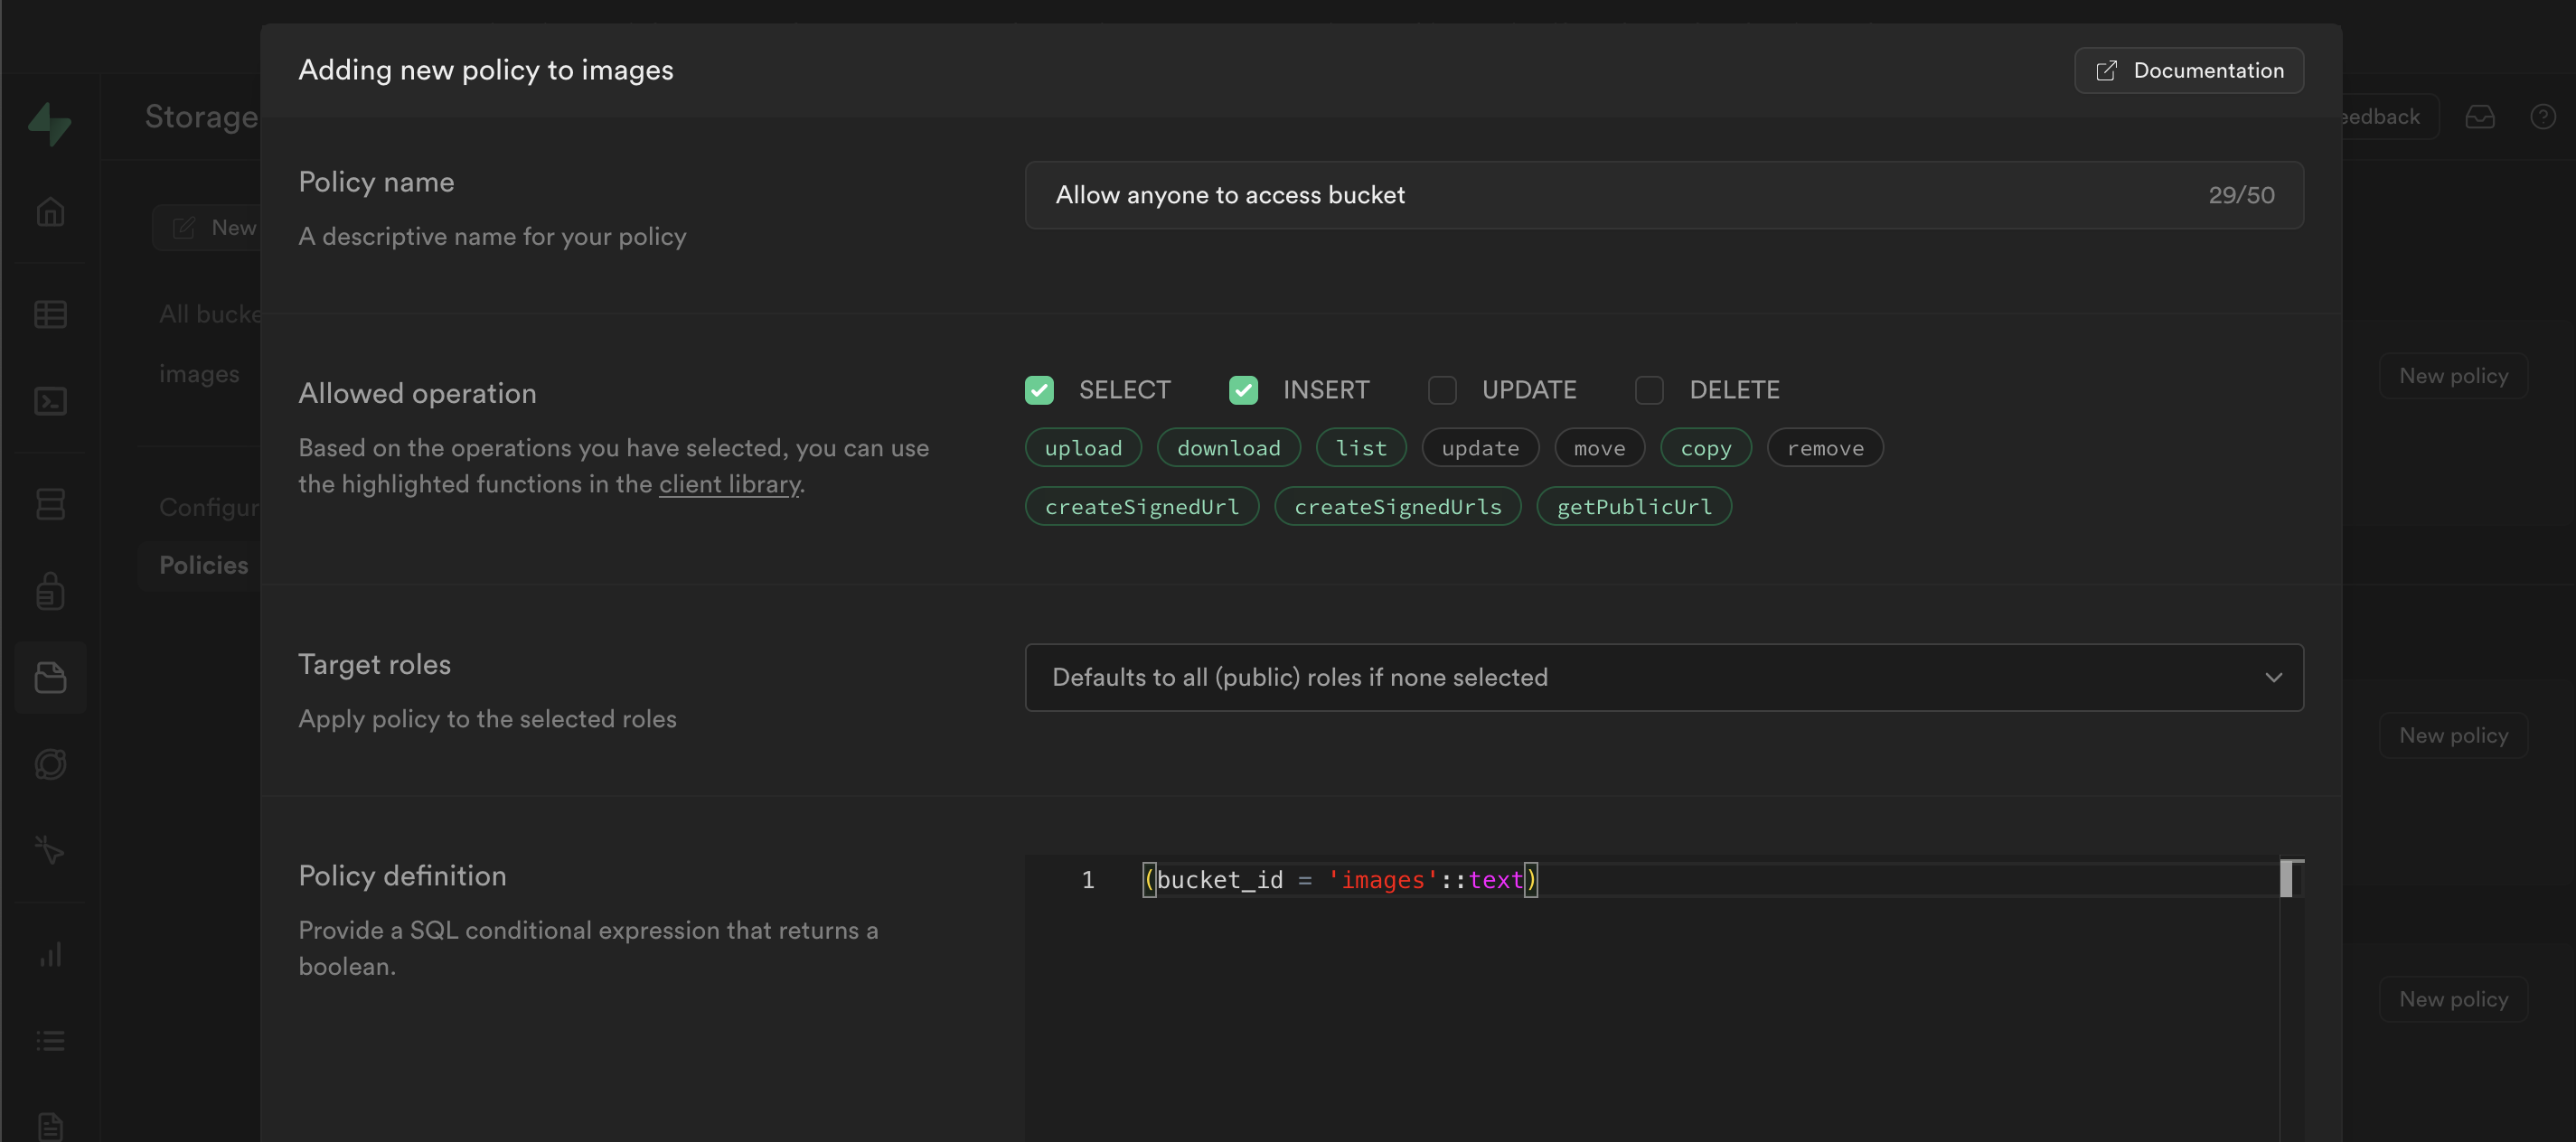
Our bucket is now ready to accept images.
Installing and Configuring Supabase
Now let's install the Supabase client library.
npm install @supabase/supabase-js
Add Supabase Api Keys to a.env File.
To interact with Supabase, we'll need to provide our project URL and anonymous key via environment variables. You can find the project URL and the anon key in the Project Settings > API on the Supabase dashboard.
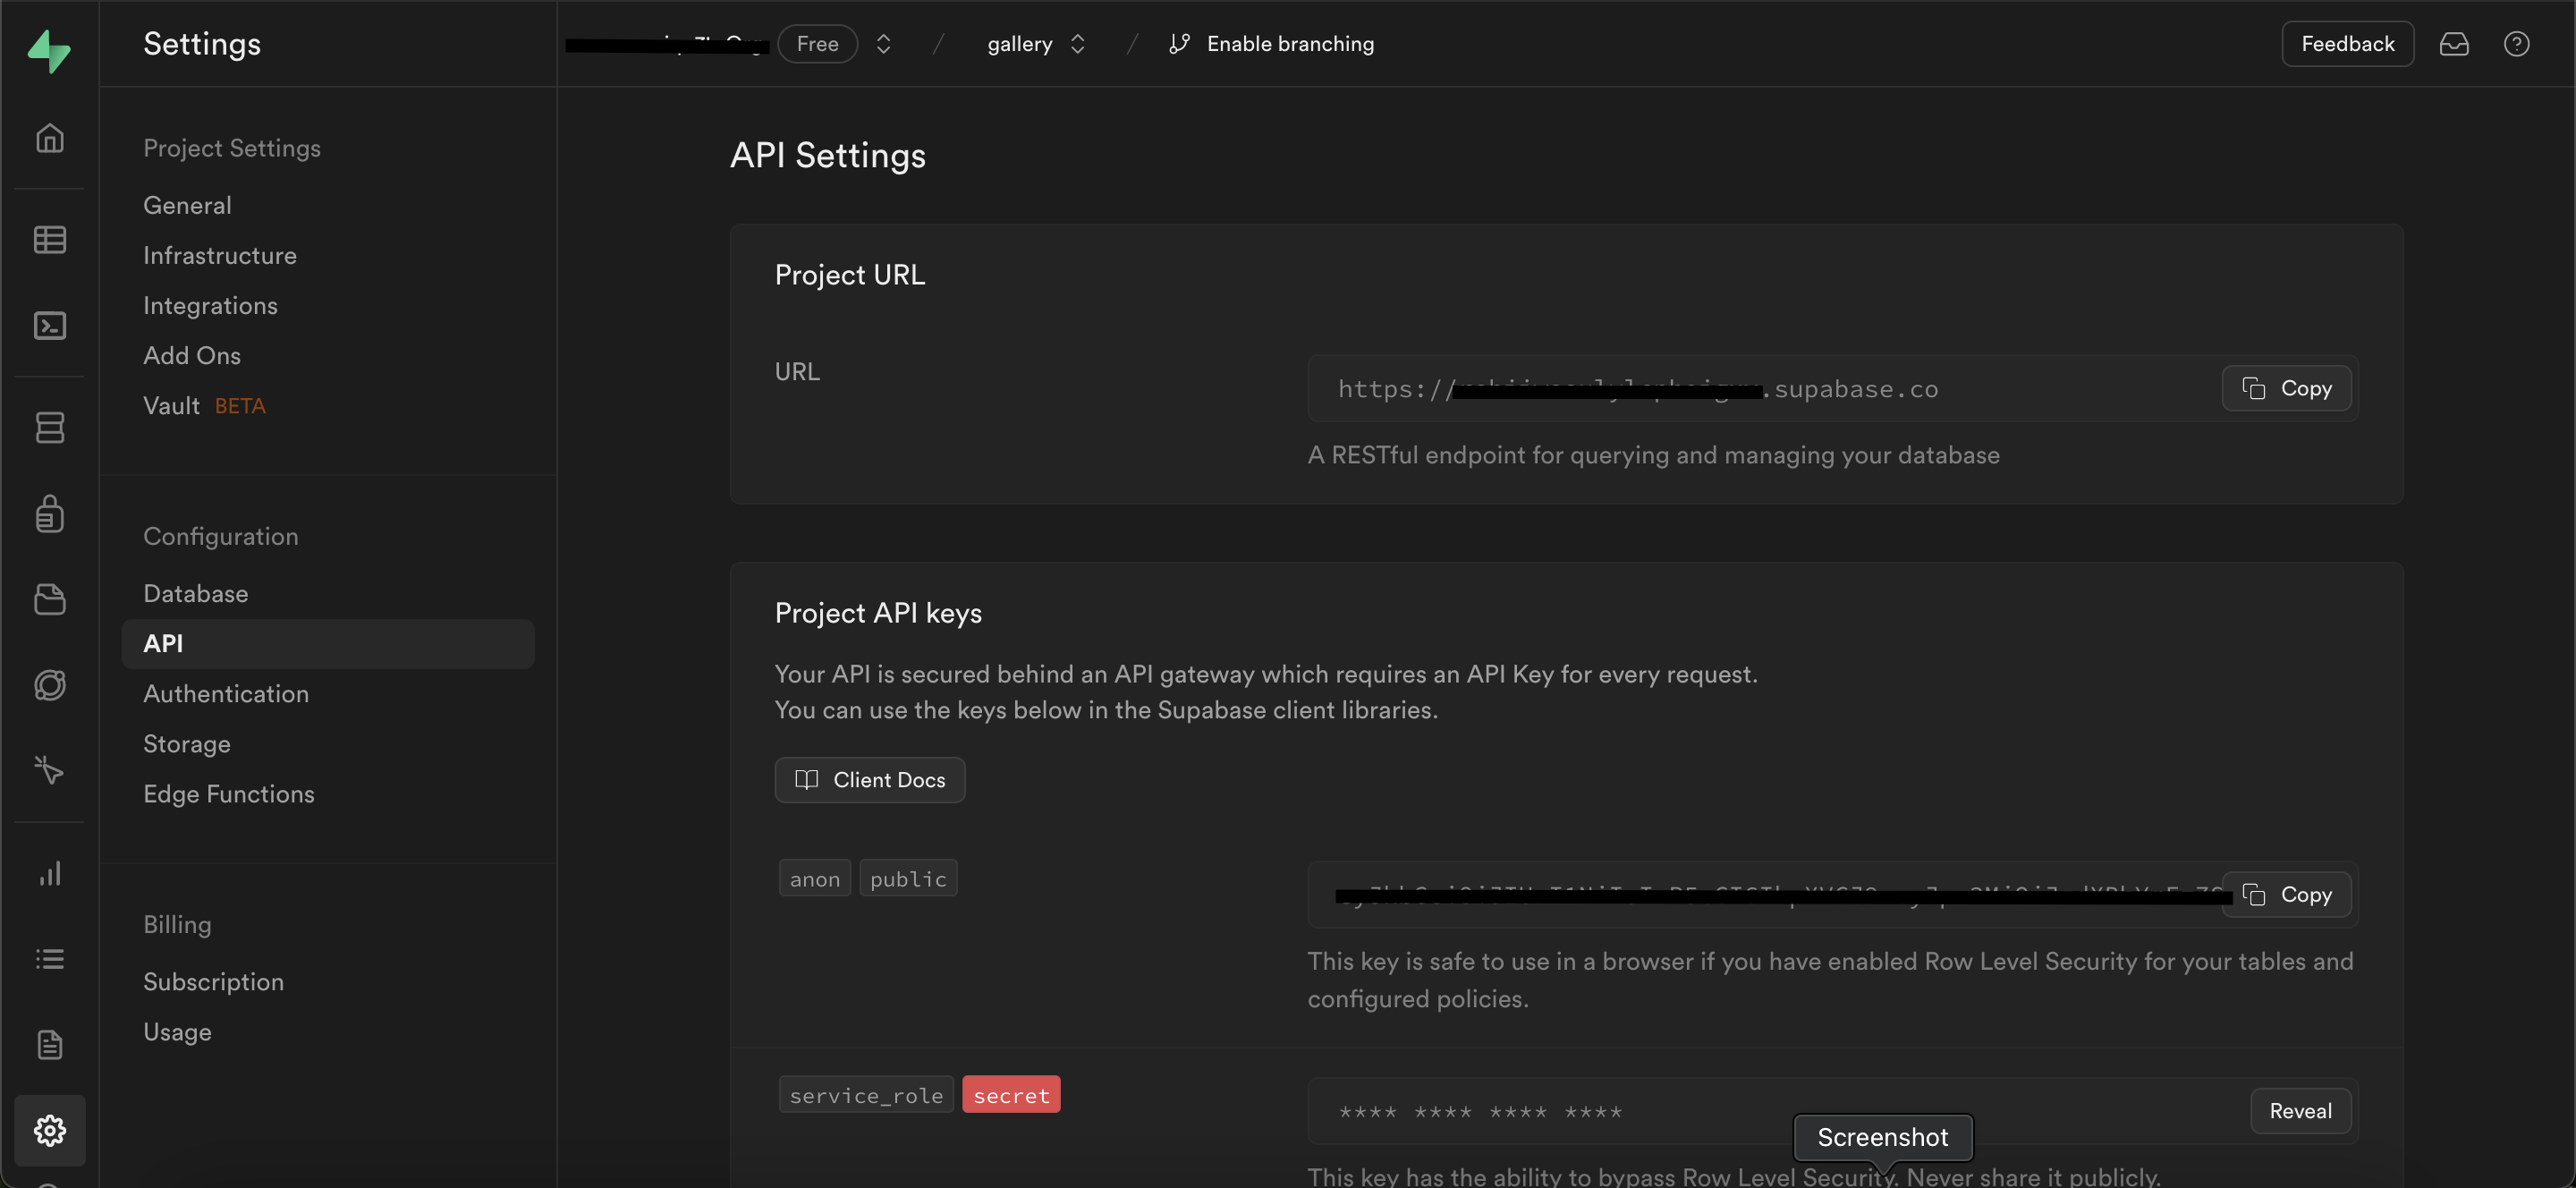
Create a .env file in your server directory and add the following. (Don’t forget to add the .env file to .gitignore!)
#server/.env

SUPABASE_PROJECT_URL=https://your-project-url.supabase.co
SUPABASE_ANON_KEY=your-anon-key
Setup the Supabase Client.
Now, let's create a file named supabase.ts (or .js) within the server directory. Here, we'll initialize the Supabase client using the provided environment variables.
// server/src/supabase.ts

import { createClient } from '@supabase/supabase-js'

const supabaseUrl = process.env.SUPABASE_PROJECT_URL as string
const supabaseKey = process.env.SUPABASE_ANON_KEY as string

export const supabase = createClient(supabaseUrl, supabaseKey)
Install base64-arraybuffer
To decode the buffer received from Multer, we'll need to install the base64-arraybuffer library as recommended by Supabase. This library encodes and decodes base64 to and from ArrayBuffers .
# install as a dev dependency with -D
npm install -D base64-arraybuffer
Update the Route Handler
Now, let's modify our route handler to upload images to Supabase.
import { supabase } from './supabase';
import { decode } from 'base64-arraybuffer';

app.post('/api/images', upload.single('file'), async (req, res) => {
  try {
    const file = req.file;

    if (!file) {
      res.status(400).json({ message: 'Please upload a file' });
      return;
    }

    // decode file buffer to base64
    const fileBase64 = decode(file.buffer.toString('base64'));

    // upload the file to supabase
    const { data, error } = await supabase.storage
      .from('images')
      .upload(file.originalname, fileBase64, {
        contentType: 'image/png',
      });

    if (error) {
      throw error;
    }

    // get public url of the uploaded file
    const { data: image } = supabase.storage
      .from('images')
      .getPublicUrl(data.path);

    console.log(file);
    res.status(200).json({ image: image.publicUrl });
  } catch (error) {
    res.status(500).json({ error: error });
  }
});
Let’s look at the changes we made.
Convert the Buffer and Upload It
After receiving the file, we convert its buffer data into a base64-encoded string representation.
file.buffer- This represents the buffer of the file that has been uploaded. Buffers are raw binary data stored in memory. Binary data refers to data that consists of binary values - 0s and 1s.file.buffer.toString("base64")- This converts the binary data in the buffer to a base64-encoded string. Base64 encoding is a way of representing binary data using 64 characters.decode(...)- This function converts the base64-encoded string back into its original binary form. This step ensures compatibility with Supabase's storage system, which expects binary data.
Next, we upload the binary data to Supabase, alongside the file name (file.originalname) and specify the content type (in this case, image/png).
Retrieve the Image URL
Optionally, if you want to display the uploaded image to the client, you can use the .getPublicUrl method to obtain the public URL of the image stored in the Supabase bucket. This method retrieves the URL based on the path provided in the upload response (data.path).
With these changes, your app is now capable of uploading images to Supabase 🚀.
Conclusion
I know firsthand that uploading images to an Express server or Supabase can be tricky 🥲. However, by following the steps outlined in this guide, you'll be able to handle image uploads smoothly and reduce your development time.
Happy coding!